Page Contents :
Windscribe VPN: Your Shield In The Digital Realm
In today’s digital age, the internet has woven itself into the fabric of our daily lives.
However, with the convenience of connectivity comes the responsibility of safeguarding our online privacy and security.
This is where Virtual Private Networks (VPNs) ![]() come into play, and Windscribe VPN
come into play, and Windscribe VPN ![]() stands out as a formidable guardian of your digital footprint.
stands out as a formidable guardian of your digital footprint.
It offers a secure and private internet connection that empowers you to browse with confidence.
• How Windscribe VPN Protects You
Windscribe VPN accomplishes this feat by directing your internet traffic through encrypted tunnels.
This technological prowess makes it a Herculean task ![]() for anyone to intercept or monitor your online activities.
for anyone to intercept or monitor your online activities.
Your digital life remains concealed, just as it should.
• Versatility Across Platforms
One of the outstanding features of Windscribe VPN is its compatibility.
It seamlessly integrates with a wide array of devices and operating systems, including Windows, macOS, Android, iOS, and more.
This versatility ensures that you can safeguard your online activities across multiple platforms.
∮ The Upsides of Windscribe VPN
- Robust Security
Windscribe VPN takes the security of your data seriously.
It employs robust encryption protocols to create an impenetrable fortress around your online activities.
With Windscribe, you can rest assured that your data remains confidential and safe from potential cyber threats. - Vast Server Network
Windscribe VPN boasts an expansive server network that spans multiple countries.
This broad reach means you can access geo-restricted content and maintain your privacy, no matter where you are.
The world of the internet is at your fingertips! - User-Friendly Interface
Navigating Windscribe VPN is a breeze, thanks to its intuitive and user-friendly app and interface.
Whether you’re new to VPNs or an experienced user, you’ll find it a seamless experience.
Your path to online protection is clear and straightforward! - Strict No-Logs Policy
Windscribe VPN’s commitment to your privacy is further underscored by its strict no-logs policy.
They don’t keep records of your online activities, ensuring that your digital footprint remains minimal.
Your secrets stay just that — yours! - Free Plan Available
Windscribe VPN understands the value of accessibility. That’s why they offer a free plan with limited features.
It’s a fantastic option for users on a budget, allowing you to explore the service without financial commitments.
Protection should be within everyone’s reach!
∮ The Downsides of Windscribe VPN
- Limited Free Plan
While the free plan is a valuable introduction, it does come with certain limitations.
Free users have access to a limited number of servers, and their connection speeds may be slower during peak times.
Consider your priorities when choosing your plan! - Variable Speeds
The speed of your connection with Windscribe VPN may fluctuate based on the server’s location and network congestion.
Although it strives to provide high-speed performance, it may not always match up to premium VPNs.
For high-demand tasks, it’s worth considering! - Streaming and Torrenting Limitations
Windscribe VPN may not be the ultimate choice for avid streamers and torrenters.
Some streaming services and torrenting sites may not operate seamlessly with this VPN.
If these activities are at the core of your online experience, you may need to explore other options. - Notable Price Tag
While the value is evident, it’s essential to note that the premium plans of Windscribe VPN are priced slightly higher compared to some competitors.
When considering the cost, weigh it against the features offered to determine the best fit for your needs.
∮ Set Up Windscribe VPN
It’s simple to set up Windscribe VPN, and I’ll walk you through it in this post.
These instructions will help you get started safely and secretly whether you’re new to VPNs or an experienced user.
Depending on your device and operating system, the exact steps could change.
- Launch your Preferred Browser
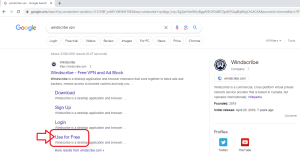
Launch your preferred web browser, such as Google Chrome, to get started. - Access the Windscribe website
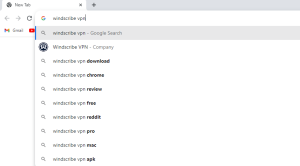
Type “Windscribe VPN” In the search box to find the official website. - Choose the Free Plan
Locate the “Use for Free” option in the search results, then click the provided link. - Arrive at the Windscribe website
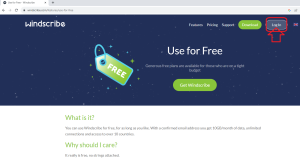
The Windscribe VPN landing page will be displayed. - Create your Account
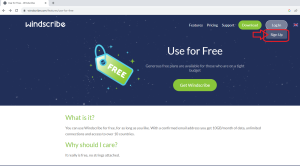
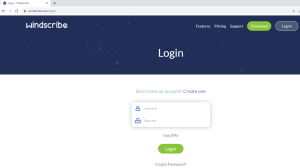
To begin, position your mouse over the “Log In” button and select the “Sign Up” option in the top-right area of the page.
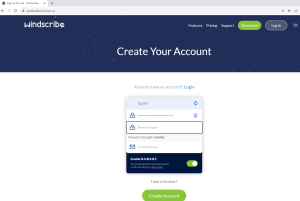
There will be a new page. - Enter your Information
To create an account, enter your preferred username, make a strong password, and then click the “Create Account” button. - Access your Account
With your new login information, you may now access your Windscribe VPN account. - Upgrade your Plan (Free 10GB)
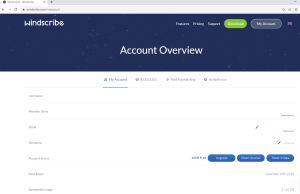
Your account page will appear after a successful login.
You will initially have a Free membership with 2GB of monthly VPN bandwidth.
The Free 10GB per month plan will, however, be automatically increased for you if you add and confirm your email address. - Download the VPN Client
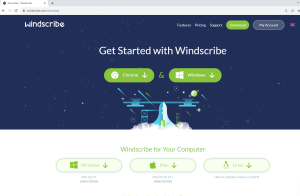
Pick “Download” from the menu in the top right corner. You’ll see the VPN client page. - Alternative Download
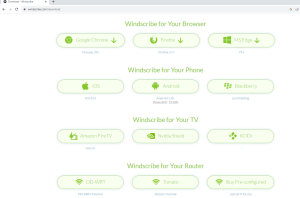
You may also scroll down to see the different client alternatives and pick the one that works with your device.
For instance, to begin downloading the installer if you are using a Windows device, click the “Windows” button. - Install Windscribe VPN
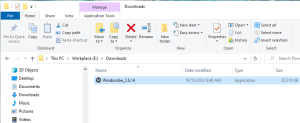
When the download is finished, use Windows Explorer to find your download folder.
The Windscribe VPN application is located there. Double-click it to initiate the VPN client installation process. - Launch Windscribe VPN
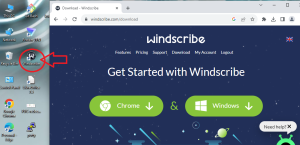
Clicking on the icon will start the Windscribe VPN software on Windows. - Windscribe Control Panel
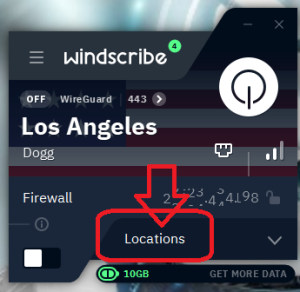
You can view the list of server locations from the Windscribe VPN Control Panel. - List of VPN Servers
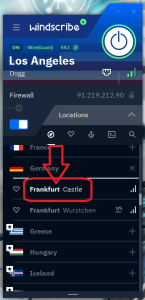
On the “Locations” tab, click to list all available server locations.
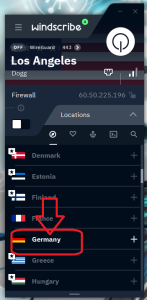
By scrolling through the server list, you can choose a free VPN server, such as one located in Germany. - Choose the VPN Loation
Click on a server location such as Frankfurt Castle. - Automatic Connection
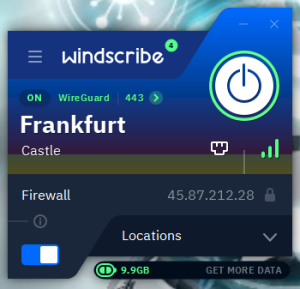
Your client will instantly establish a connection to the chosen Windscribe VPN server.
A German-Frankfurt VPN server, for instance, will be indicated on the screen. Verify your IP Location
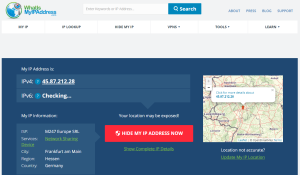
Use a tool like WhatIsMyIPAddress , which will display your IP as per the linked server, to confirm your new IP location.
It should, for instance, display Hessen, Germany as your location.

Congratulations! Enjoy more security and privacy when browsing the internet. Utilise Windscribe VPN to stay secure and protected online!
Enhancing Your Digital Security: Microsoft VPN Client With VPNBook
In a world where digital security and privacy are of utmost importance, the utilization of VPNs has soared to new heights.
These ingenious tools empower individuals to protect their online activities from prying eyes and potential threats.
Microsoft, a tech giant renowned for its innovations, offers its VPN client.
Pairing it with VPNBook ![]() emerges as a popular and accessible choice for those looking to bolster their online security.
emerges as a popular and accessible choice for those looking to bolster their online security.
Microsoft’s VPN client, an integral feature within Windows operating systems, facilitates secure connections to remote networks.
It’s the digital armor shielding your data during your online ventures.
VPNBook, on the other hand, is a third-party VPN service.
When configured with Microsoft’s VPN client, it acts as the extra layer of protection that many seek to fortify their online privacy.
This dynamic duo is predominantly designed for Windows users, and while it may not be as universally compatible as some other options, it presents a robust solution.
∮ The Advantages of Microsoft VPN Client with VPNBook
- Unwavering Security and Encryption
By harnessing the combined power of Microsoft VPN Client and VPNBook, you’re enveloped in a cocoon of security through state-of-the-art encryption protocols.
Your data remains impervious to potential cyber threats, ensuring your digital world stays confidential and protected. - Cost-Efficiency at Its Best
VPNBook extends the olive branch with its free VPN service, which translates to a cost-effective choice for users on a budget.
This partnership between Microsoft VPN Client and VPNBook offers a haven of security without the burden of extra expenses. - A Global Network of Servers
VPNBook’s expansive server network unlocks the world for you.
You can seamlessly access content from various regions, evading geo-restrictions while safeguarding your online privacy.
Your digital wanderlust knows no bounds. - The Sanctuary of No-Logs Policies
Both Microsoft VPN Client and VPNBook hold fast to the sacred tenets of no-logs policies.
This means they don’t leave behind the breadcrumbs of your online activities.
Your privacy ascends to a higher realm, untouched by prying eyes. - User-Friendly Configuration
Configuring VPNBook with Microsoft’s VPN client is a walk in the digital park.
Even if you’re a novice in the world of VPNs, the process is intuitive and doesn’t demand advanced technical prowess.
It’s a seamless transition into enhanced online security.
∮ The Limitations of Microsoft VPN Client with VPNBook
- A Bit Short on Advanced Features
While this alliance excels in security, it might not offer some of the advanced features found in premium VPN services.
Users on the hunt for specialized functionalities may need to embark on a quest for other options. - The Ebb and Flow of Performance
The speed and performance of this partnership may be subject to the whims of server location and network congestion.
While it strives for consistent speed, there may be moments when it doesn’t quite match the pace of premium VPNs. - Streaming and Torrenting Challenges
For the avid streamer or torrent aficionado, hurdles might arise.
Not all streaming services and torrenting sites may harmonize seamlessly with this VPN configuration.
It’s worth considering your preferences and priorities. - Compatibility Quirks
The configuration of VPNBook with Microsoft’s VPN client might not extend its compatibility hug to all devices and operating systems.
This slightly narrows its range but not its effectiveness. - Limited Technical Support
Free VPN services, including VPNBook, may offer limited customer support.
When in need of assistance or problem resolution, you might find yourself in somewhat of a digital wilderness.
∮ Setting Up Microsoft VPN Client with VPNBook
On Microsoft’s VPN client, setting up a VPN connection with VPNBook is simple.
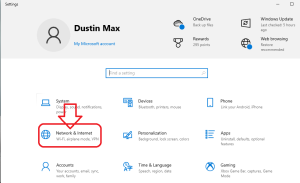
- Navigate to Windows Settings
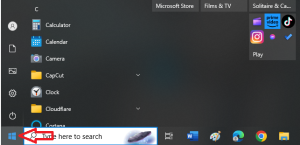
To get started, click on the Windows logo in the bottom left corner of your screen. - Open Windows Settings
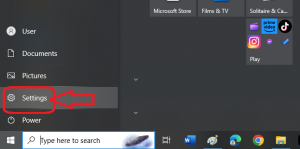
Choose the “Settings” option from the menu on the left. - Go to the Network Settings
The Windows Settings screen will then be displayed. After that, select “Network & Internet.” - Access VPN Settings
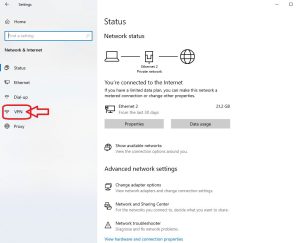
You will now be on the “Network & Internet” page, where the left sidebar has some menu options.
Pick “VPN” from the provided selection. - VPN Connection
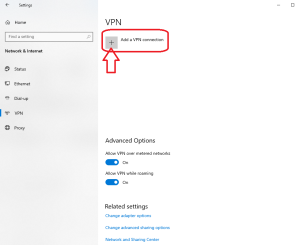
A new VPN page will open on the screen’s right side. You’ll add your new VPN connection here, so look for the “✚” button. - Add a New VPN Connection
When you click on it, a pop-up window appears. We need to get the VPNBook information ready before moving on. - Launch your Preferred Browser
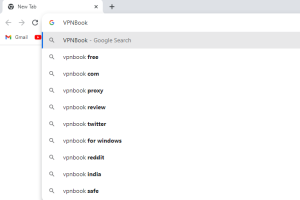
To get the necessary VPNBook information, launch your choice web browser, such as Google Chrome. - Lookup VPNBook
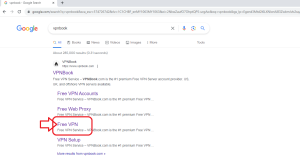
To find the official website, type “VPNBook” into the browser’s search bar. - Visit the VPNBook Website
Select the VPNBook link in the list of search results. - Choose the Best Strategy
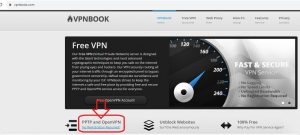
You’ll be taken to the landing page for the VPNBook VPN.
Choose the “PPTP and OpenVPN” link to begin because there is no registration needed for this choice. - Gather VPNBook Information
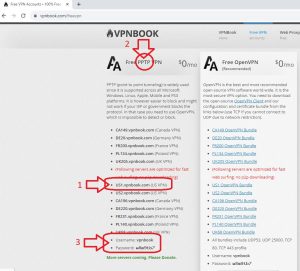
Because it supports Windows, pick the first option, “Free PPTP VPN.” - Configure the VPN Connection
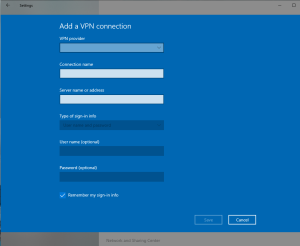
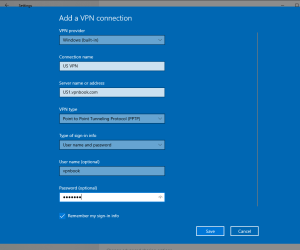
Let’s return to the “Add a VPN connection” screen at this time.
Select “Windows (built-in)” in the “VPN provider” section. In the “Connection name” section, give your VPN connection a special name, for example “US VPN“.
To copy the server name, go back to the VPNBook page, copy “US1.vpnbook.com” and paste it into the “Server name or address” field.
Choose “Point to Point Tunnelling Protocol (PPTP)” for the “VPN type.”
Select “User name and password” under “Type of sign-in info.”
The username and password must be copied from the VPNBook page’s list of Free PPTP VPNs and entered in the relevant fields marked “User name” and “Password.” Press the “Save” button to finish. - New VPN Connection
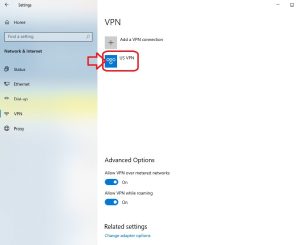
On the screen, your freshly set up VPN connection – “US VPN” will show up. - Connect to VPNBook
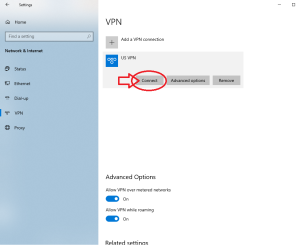
Click the “Connect” button to establish a connection to your VPNBook server. - Automatic Connection
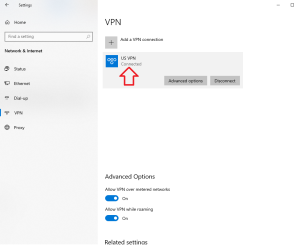
Once you successfully connect to the VPNBook server, a “Connected” notification will appear below the “US VPN” label. Verify Your IP Location
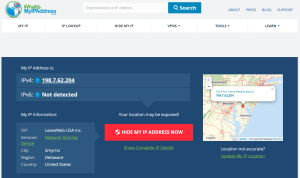
Use a service like WhatIsMyIPAddress , which will display your IP based on the connected server, to confirm the location of your new IP address.
It should, for instance, display Delaware, USA as your location.

You have all you need right now to use Microsoft VPNBook safely and discreetly. Enjoy the improved internet security and privacy.
Elevate Your Online Security: Google 1.1.1.1 With WARP
In an era where online privacy and security take center stage, Google 1.1.1.1 with WARP ![]() has emerged as a steadfast guardian of your digital footprint.
has emerged as a steadfast guardian of your digital footprint.
Google 1.1.1.1 serves as a remarkable DNS resolver service, while WARP stands as a vigilant VPN service.
Google 1.1.1.1 with WARP combines these forces to offer not only a turbocharged browsing experience but also an added layer of online security.
This dynamic duo encrypts your internet traffic, transforming it into an enigma that malicious actors find exceptionally challenging to decipher.
While the primary goal is to supercharge your browsing, real-world performance may fluctuate depending on your location and network conditions.
∮ The Advantages of Google 1.1.1.1 with WARP
- Enhanced Security
A standout feature of Google 1.1.1.1 with WARP is its robust security.
It shields your online data by encrypting DNS queries, ensuring that potential threats are held at bay.
Your digital fortress just got more impenetrable. - Faster Browsing
Harnessing the extensive network infrastructure of Google 1.1.1.1 with WARP aims to whisk you away into the fast lane of the internet.
It promises swifter and more reliable connections, guaranteeing a seamless browsing experience. - Simple Setup
Fear not the complexities of installation. Setting up Google 1.1.1.1 with WARP is a breeze.
It caters to both beginners and tech aficionados, providing clear-cut instructions that lead you to fortified online security. - Free Basic Plan
The service extends its hand with a free basic plan, an open door for users eager to bolster their online security without opening their wallets.
It’s an invitation to explore without the burden of financial commitment. - No-Logs Policy
Google 1.1.1.1 with WARP abides by a stringent no-logs policy, ensuring that it remains oblivious to your online activities.
This commitment to data privacy wraps you in a cloak of anonymity, away from prying eyes.
∮ The Limitations of Google 1.1.1.1 with WARP
- Limited Features
While excelling in security and speed, Google 1.1.1.1 with WARP doesn’t come loaded with some advanced features that premium VPNs often flaunt.
Functions like server selection and additional security protocols might be scarce. - Paid Plans
While the free basic plan is the welcoming gateway, the realm of advanced features and faster speeds comes at the cost of a subscription fee.
It might not align with the budget-conscious user’s aspirations. - Geographical Constraints
Compared to other VPN services, Google 1.1.1.1 with WARP might sport a limited number of server locations.
This could potentially influence your ability to transcend geo-restrictions. - Compatibility Issues
As versatile as it may be, the service might not bear the compatibility stamp for all devices and operating systems.
This somewhat narrows its reach, depending on your digital ecosystem. - Data Privacy Concerns
In a world where data is the currency of giants, concerns about data privacy can arise.
Users who treasure anonymity might ponder the implications of seeking refuge in a service from a tech behemoth like Google.
∮ Setting Up Google 1.1.1.1 with WARP
Setting up Google 1.1.1.1 with WARP involves downloading the app, and following the setup instructions.
This guide will walk you through the steps to get your connection up and running.
- Begin the Setup
Start by launching your preferred web browser; for example, you can use Google Chrome. - Find the Official Website
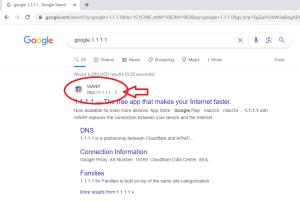
In the search bar of your web browser, type “google 1.1.1.1” to locate the official website. - Lookup the WARP 1.1.1.1 Page
From the search results, click on the first link “WARP 1.1.1.1.” - Visit the WARP 1.1.1.1 Page
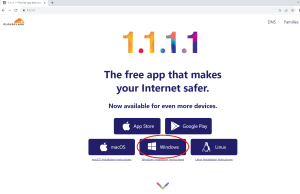
You’ll be directed to the WARP 1.1.1.1 landing page. - Choose Your Device
On the landing page, you’ll find various support platforms.
For this setup, select the “Windows” device, and the download process will begin. - Install the Application
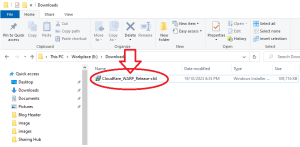
After the download is complete, open your download folder using Windows Explorer. You’ll find the Cloudflare WARP application there.
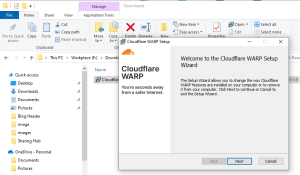
Double-click on it and follow the installation instructions for the VPN client. - Follow the Setup Instructions
To finish the installation, keep following the on-screen instructions. - Locate the WARP
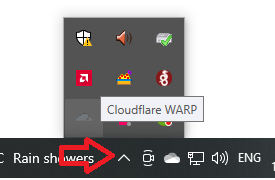
After you’ve finished the installation, move your cursor to the bottom right of your screen where you can find the “Show hidden icons” option.
Locate your Cloudflare WARP icon and click on it. - Launch WARP for the First Time
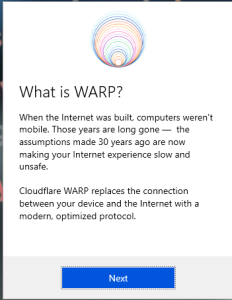
For the first-time launch, a brief WARP introduction will appear. Click the “Next” button to proceed. - Accept Policies and Terms
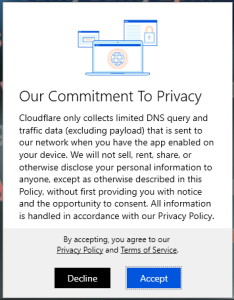
To launch the WARP Control Panel, you’ll need to accept the policy and terms of service. - Launch the Control Panel
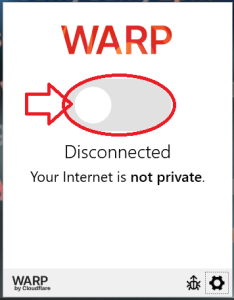
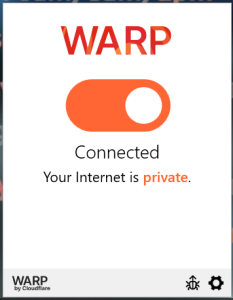
After accepting, you’ve successfully launched your WARP control panel. - Connect to WARP VPN Server
Slide the white round button to connect to the WARP VPN server. Once connected, you’re ready to enjoy secure browsing. - Access Connectivity Information
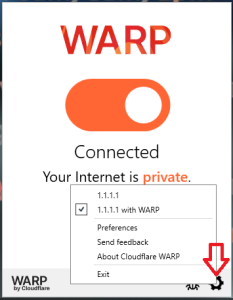
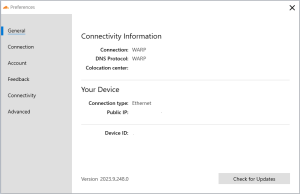
To check your connectivity details, click on the setting icon located at the bottom right of your WARP Control Panel. - View Connectivity Information
A pop-up screen will display your settings info, as shown. Verify your IP Location
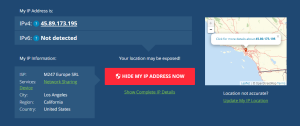
To confirm your new IP location, you can use a service like WhatIsMyIPAddress , which will display your IP based on the connected server.
For example, it should show your location as California, United States.


You are now fully equipped to use Google 1.1.1.1 with WARP for secure and private browsing. Enjoy your enhanced online experience.

