Page Contents :
Unleash the Power of C Programming with Cygwin C on Windows
Are you a Windows user looking to harness the power of C programming?
If you are, you’ve likely encountered some challenges in setting up your development environment.
That’s where Cygwin C for Windows ![]() comes to the rescue.
comes to the rescue.
In this comprehensive guide, we’ll introduce you to Cygwin and its advantages for C programming on the Windows platform.
Cygwin is a powerful and versatile tool that brings a Unix-like environment to Windows.
It offers a Unix-like terminal and a wide range of pre-compiled software packages.
As an open-source project, Cygwin bridges the gap between the Windows and Unix/Linux worlds, making it an excellent choice for developers who want to work with C in a familiar and powerful environment.
Why Choose Cygwin C for Windows?
- Unix-like Environment on Windows
Cygwin C brings the Unix-like environment to your Windows machine. This means you get access to the powerful bash shell, a plethora of command-line tools, and a directory structure akin to Unix. If you’re familiar with Unix or Linux, you’ll feel right at home, ensuring a seamless transition into C programming. - Seamless Installation with Package Manager
Cygwin boasts a user-friendly package manager that streamlines the installation, updating, and removal of software packages. This simplifies the setup of your C development environment, ensuring you have all the essential tools and libraries at your fingertips. - Multiple Compiler Options
Cygwin C supports various C compilers, including the renowned GCC (GNU Compiler Collection) and Clang. This versatility allows you to choose the compiler that best suits your project’s requirements. Whether you prioritize performance, compatibility, or specific features, Cygwin C accommodates your preferences. - Extensive Software Repository
Cygwin opens the door to a vast repository of pre-compiled software packages. This treasure trove includes libraries, development tools, and utilities, making it easier than ever to set up your C programming environment. Say goodbye to the complexities of manual searches and installations; Cygwin simplifies the process, ensuring that all the resources you need are within reach. - Scripting and Automation
The Unix-like environment provided by Cygwin empowers you with scripting and automation capabilities. This is invaluable for automating repetitive tasks, making your development process more efficient. Focus on creative problem-solving instead of mundane, manual work. - Cross-Platform Compatibility
With Cygwin, you can develop your C applications on Windows and seamlessly transfer them to Unix or Linux systems with minimal adjustments. This cross-platform compatibility is a game-changer for developers working on diverse environments. - Active Community and Support
Cygwin has a dedicated and vibrant community of users and developers. Whether you’re a newbie or an experienced coder, you’ll find a wealth of support, advice, and solutions to your questions and challenges. The collaborative spirit of the Cygwin community ensures that you’re never alone on your C programming journey, making it an ideal place to seek help and share knowledge.
Installation of Cygwin C for Windows
- Find the Official website:
Launch your preferred web browser, such as Google Chrome, to get started.
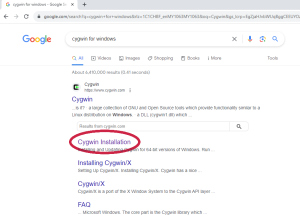
Type “cygwin” In the search box to find the official website. Lookup the Cygwin website:
Select the “Cygwin Installation ” link in the list of search results.
Download the 64-bit Installer:
The Cygwin install page will be displayed.
Select the “setup-x86_64.exe >” link, and the download process will begin.
Alternative Download for the 32-bit Installer:
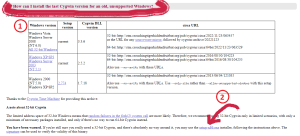
For 32-bit Windows, you may scroll down the section of “How can I install the last Cygwin version for an old, unsupported Windows?“.
Click the “setup-x86.exe ” link to begin downloading the installer.
- Run the Cygwin Installer:
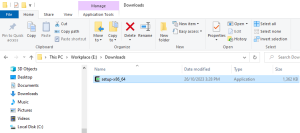
When the download is finished, use Windows Explorer to find your download folder.
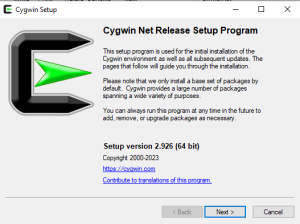
The Cygwin application is located there. Double-click the installer to launch it. - Follow the Setup Instructions:
To start the installation, following the on-screen instructions. - Choose Installation Type:
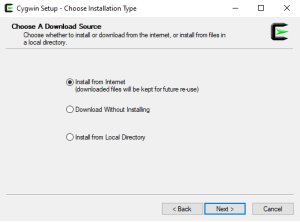
Select “Install from the Internet” as the installation source and click “Next.” - Select Root Directory:
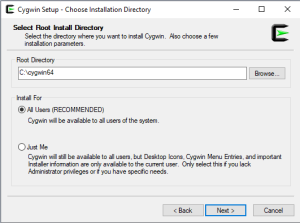
Choose a directory for the root directory where Cygwin packages will be stored. The default is typically suitable. Click “Next.” - Select Local Package Directory:
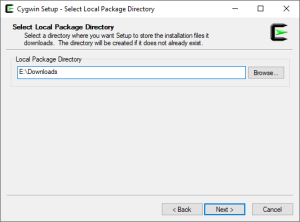
Choose a directory where you want to store installation files temporarily. The default directory is fine. Click “Next.” - Choose Internet Connection Type:
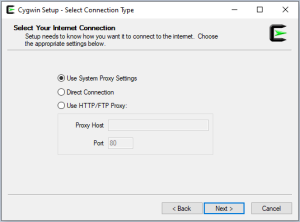
Select the appropriate option based on your internet connection and click “Next.” - Select Download Site:
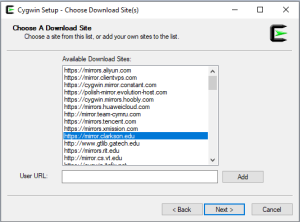
Choose a download site near your location or use the default. Click “Next.” - Search for Packages:
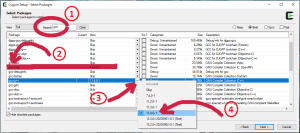
In the “View” drop down box select Full to view all Package.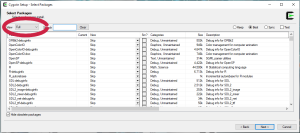
View the full Cygwin packages
In the “search” bar, type “gcc” and press Enter.
In the “Devel” category, you’ll find “gcc-core” and “gcc-g++.”
These are essential for C/C++ development. Select the version to install. - Select Additional Packages:
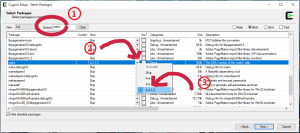
In the “search” bar, type “gdb” and press Enter. Check the box next to “gdb” in the “Devel” category.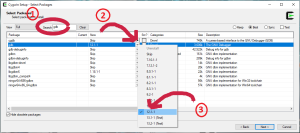
Install gdb package
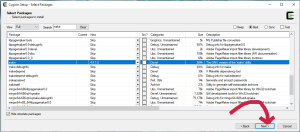
In the “search” bar, type “make” and press Enter. Check the box next to “make” in the “Devel” category. - Install Cygwin:
Click “Next” to proceed. - Review and Confirm:
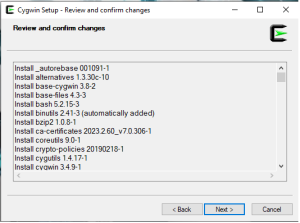
The installer will detect and resolve any dependencies.
Review the selected packages and click “Next.” - Download and Install:
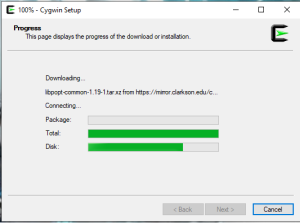
The installer will download and install the selected packages. This may take some time. - Create Icons:
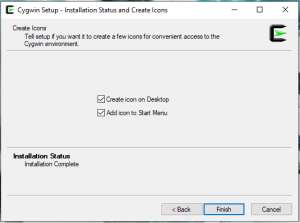
You can choose whether to create icons for Cygwin on your desktop or Start Menu. Make your selection and click “Finish.” - Add Cygwin Path to Windows System Path:
To ensure your system can find the Cygwin executables, add the Cygwin bin directory to your Windows system path.
Right-click on “This PC” or “My Computer” and select “Properties.”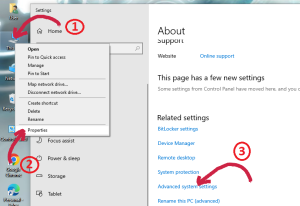
Add Cygwin path
Click on “Advanced system settings” and then “Environment Variables.”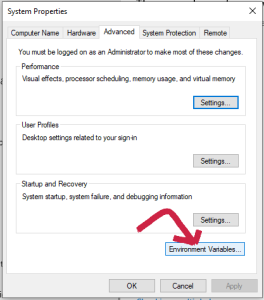
System Properties
In the “System Variables” section, scroll down to find “Path” and click “Edit.”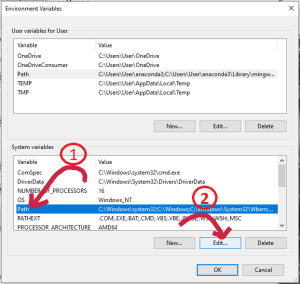
Environment variables
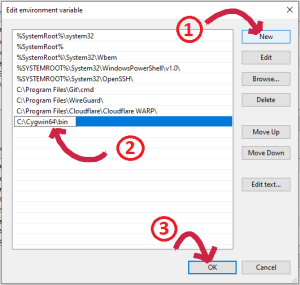
Click “New” and add the path to your Cygwin bin directory, e.g., C:\Cygwin64\bin.
Click “OK” to save the changes. - Testing Cygwin Installation:
To confirm that Cygwin C has been successfully installed, open the “Command Prompt.”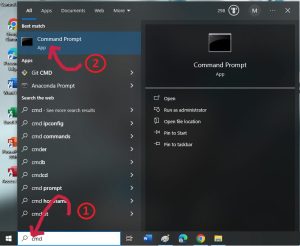
Open command prompt
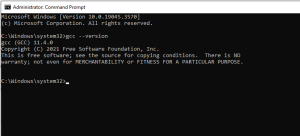
In the command prompt, type the following command and press Enter: “gcc –version“.
You should see information about the GCC compiler, which confirms a successful installation.

You have now successfully installed Cygwin C for Windows and added it to your system’s path. This ensures you can easily use Cygwin for C/C++ development.


